


How to Eliminate Dead Zones in Tank Cleaning: A Field Engineer's Guide to Complete Coverage
If you're experiencing inconsistent cleaning results, product contamination, or regulatory compliance issues with your tank washing system, the culprit is likely dead zones—areas where spray coverage simply doesn't reach. Inadequate coverage is the root cause of roughly 70% of tank cleaning failures. This guide covers proven strategies to identify, eliminate, and prevent dead zones using proper nozzle selection, positioning, and validation methods.
Table of Contents
- Understanding Dead Zones
- The Four Root Causes of Dead Zones
- Nozzle Selection for Complete Coverage
- Calculating Coverage: Worked Example
- Installation Best Practices
- Field Validation Methods
- Troubleshooting Persistent Dead Zones
- FAQ
- Conclusion
1. Understanding Dead Zones
A dead zone is any tank surface area receiving insufficient spray impact force or liquid coverage to remove residues within your cycle time. In pharmaceutical applications, even a 2-square-inch dead zone can harbor biofilm and trigger batch rejection. We've documented cases where a single dead zone around a poorly positioned agitator mount led to $180,000 in contaminated product losses over six months.
Dead zones aren't always obvious. High-turbidity fluids can mask them, and visual inspection often misses critical areas: behind baffles, around heating coils, at the tank bottom near the outlet, and in cone transition zones. The most reliable indicator is residue buildup found during routine inspections or, worse, during an audit. From a regulatory standpoint, FDA 21 CFR Part 211.67 and EHEDG guidelines require validated cleaning procedures that demonstrate complete surface coverage—dead zone elimination isn't optional, it's a compliance requirement.
2. The Four Root Causes of Dead Zones
Insufficient Spray Throw Distance: Beyond a nozzle's effective throw distance, droplets lose momentum and impact force. For a rotary jet head at 40 PSI, effective throw is typically 8–12 feet. In tall vertical tanks exceeding 20 feet, a single top-mounted nozzle won't reach the bottom with adequate force.
Shadowing from Internal Structures: Baffles, coils, thermowells, level sensors, and agitator shafts create spray shadows. A 4-inch baffle can shadow a 24-inch zone behind it. We've measured cases where heating coils blocked up to 35% of wall coverage.
Incorrect Nozzle Type for Vessel Geometry: Static spray balls work well in small tanks under 500 gallons but struggle in tall or elongated vessels. Rotary jet heads cover larger areas but require adequate cycle time. Using the wrong type for your geometry creates dead zones.
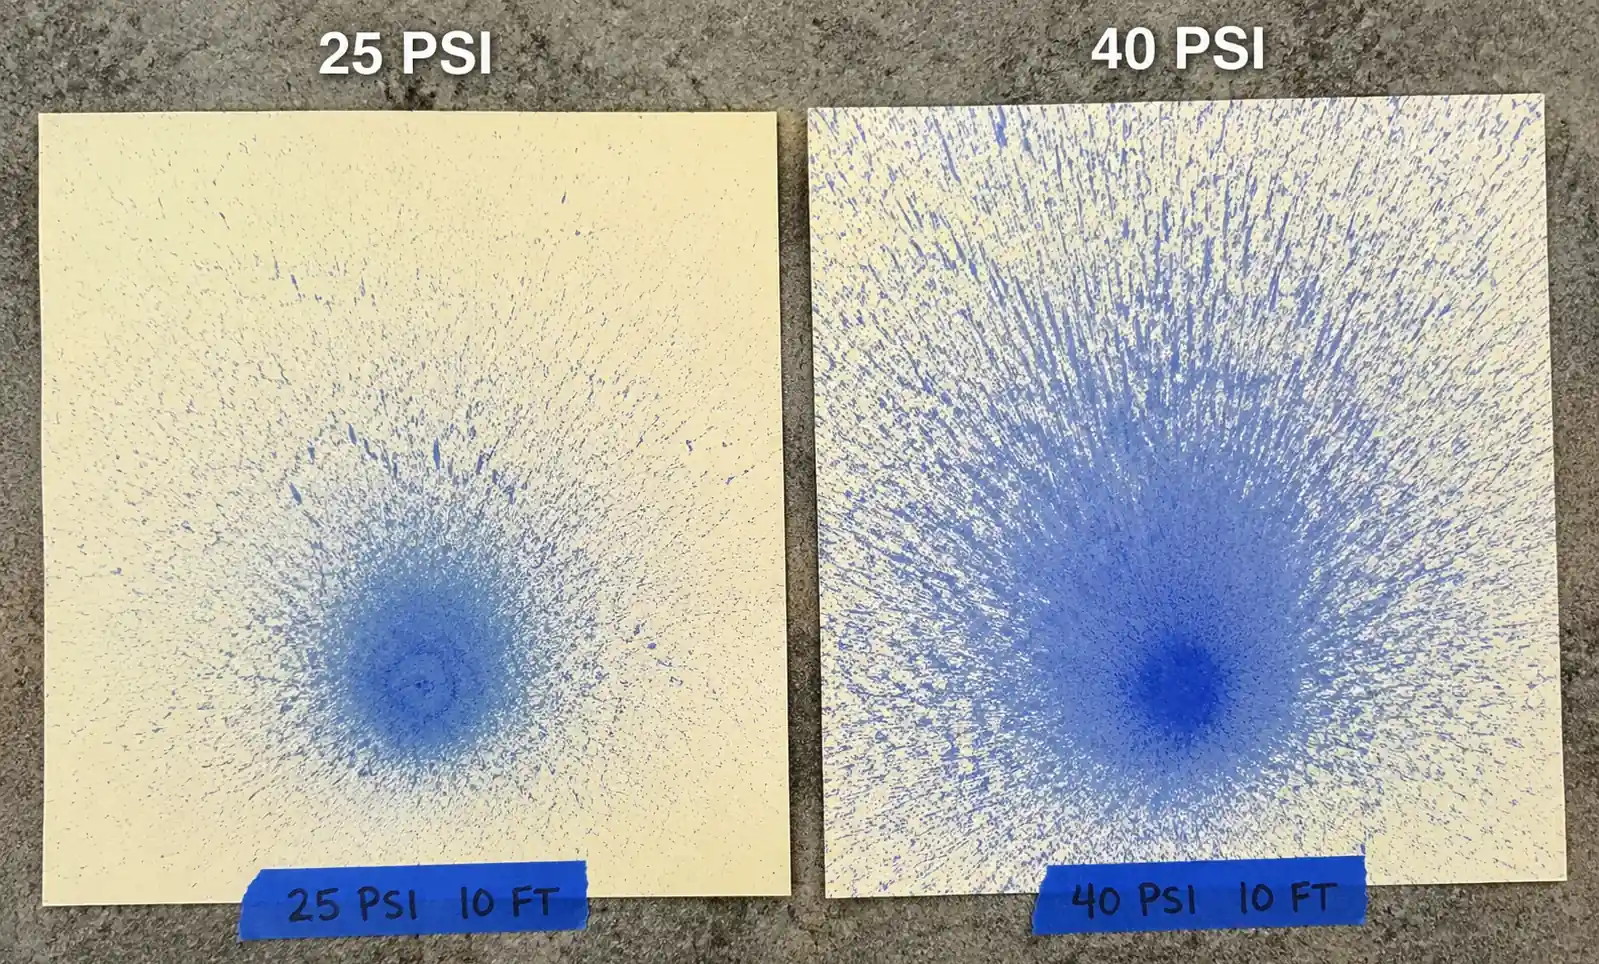
Insufficient Pressure or Flow Rate: A nozzle designed for 40 PSI will underperform at 25 PSI—spray throw shortens, impact force drops by ~37%, and coverage gaps appear. Conversely, excessive pressure can over-atomize, reducing impact despite higher velocity.
3. Nozzle Selection for Complete Coverage
| Parameter | Static Spray Ball | Rotary Jet Head | Engineering Rationale |
|---|---|---|---|
| Effective tank volume | Up to 500 gallons | 500–50,000+ gallons | Static balls lack throw distance for large vessels |
| Cleaning intensity | Low to moderate | High | Rotary heads achieve 5–15 PSI impact at 10-foot distance |
| Cycle time | 2–5 minutes | 5–15 minutes | Rotary heads need time to complete rotation pattern |
| Flow rate requirement | 5–20 GPM | 10–80 GPM | Static balls distribute flow; rotary heads concentrate into fewer jets |
| Clog resistance | Moderate (many small orifices) | High (larger orifices) | Rotary heads use 0.25–0.5" orifices vs. 0.06–0.12" for static balls |
| Internal obstructions | Struggles with shadows | Better shadow penetration | Rotary jets "see around" obstructions through rotation |
| Cost (installed) | $150–$800 | $2,000–$12,000 | Rotary heads require bearings, seals, higher-pressure pumps |
How to use this table: Start with tank volume and required cleaning intensity. For light residues in small tanks, static spray balls are cost-effective. For baked-on residues, scale, or large vessels, rotary jet heads are non-negotiable.
Key specifications to verify:
- Flow rate at operating pressure: Q ∝ √P—a nozzle rated 30 GPM at 40 PSI delivers ~21 GPM at 20 PSI
- Spray throw distance: Your tank radius should be within 80% of rated throw
- Rotation cycle time: Your cleaning cycle must exceed the nozzle's rotation period
- Connection and material: 316L for sanitary, Hastelloy C for aggressive acids, PTFE-coated for bases
4. Calculating Coverage: Worked Example
Given:
- Tank: 10,000 gallons, 10-ft diameter, 17-ft straight side, 3-ft cone bottom
- Internal structures: 6" agitator shaft, two 4" baffles
- Residue: protein-based (requires mechanical impact)
- Cleaning solution: 2% caustic at 150°F
- Available pressure: 40 PSI, target cycle: 10 minutes
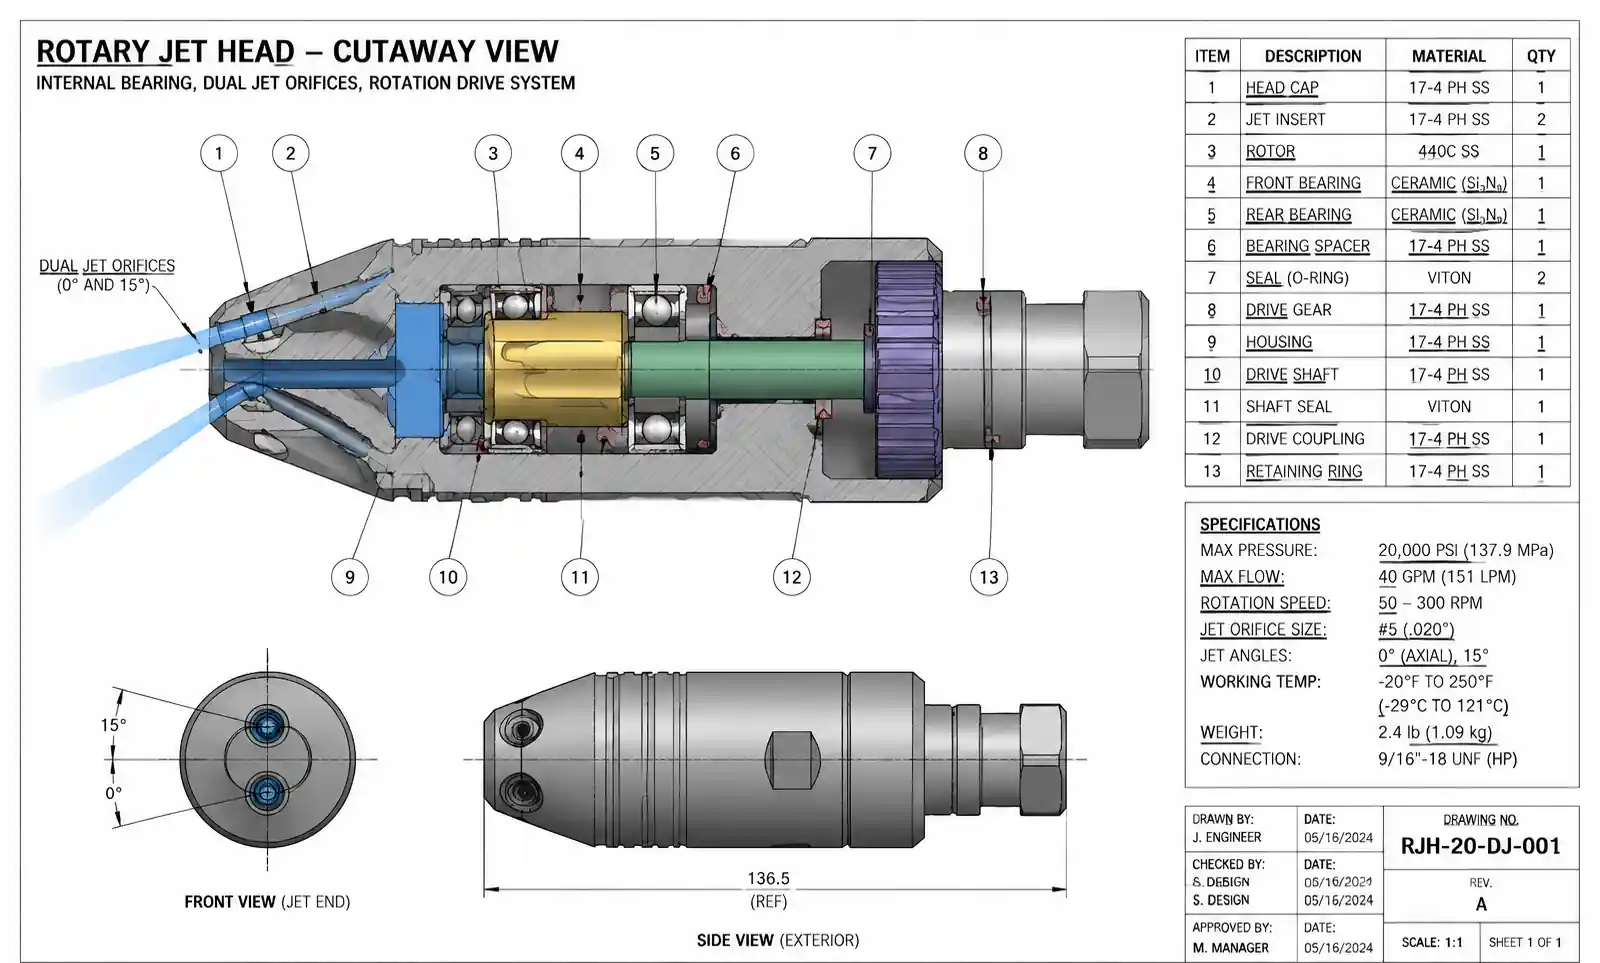
Step 1: Determine nozzle type — Large volume, tall geometry, mechanical impact needed → rotary jet head.
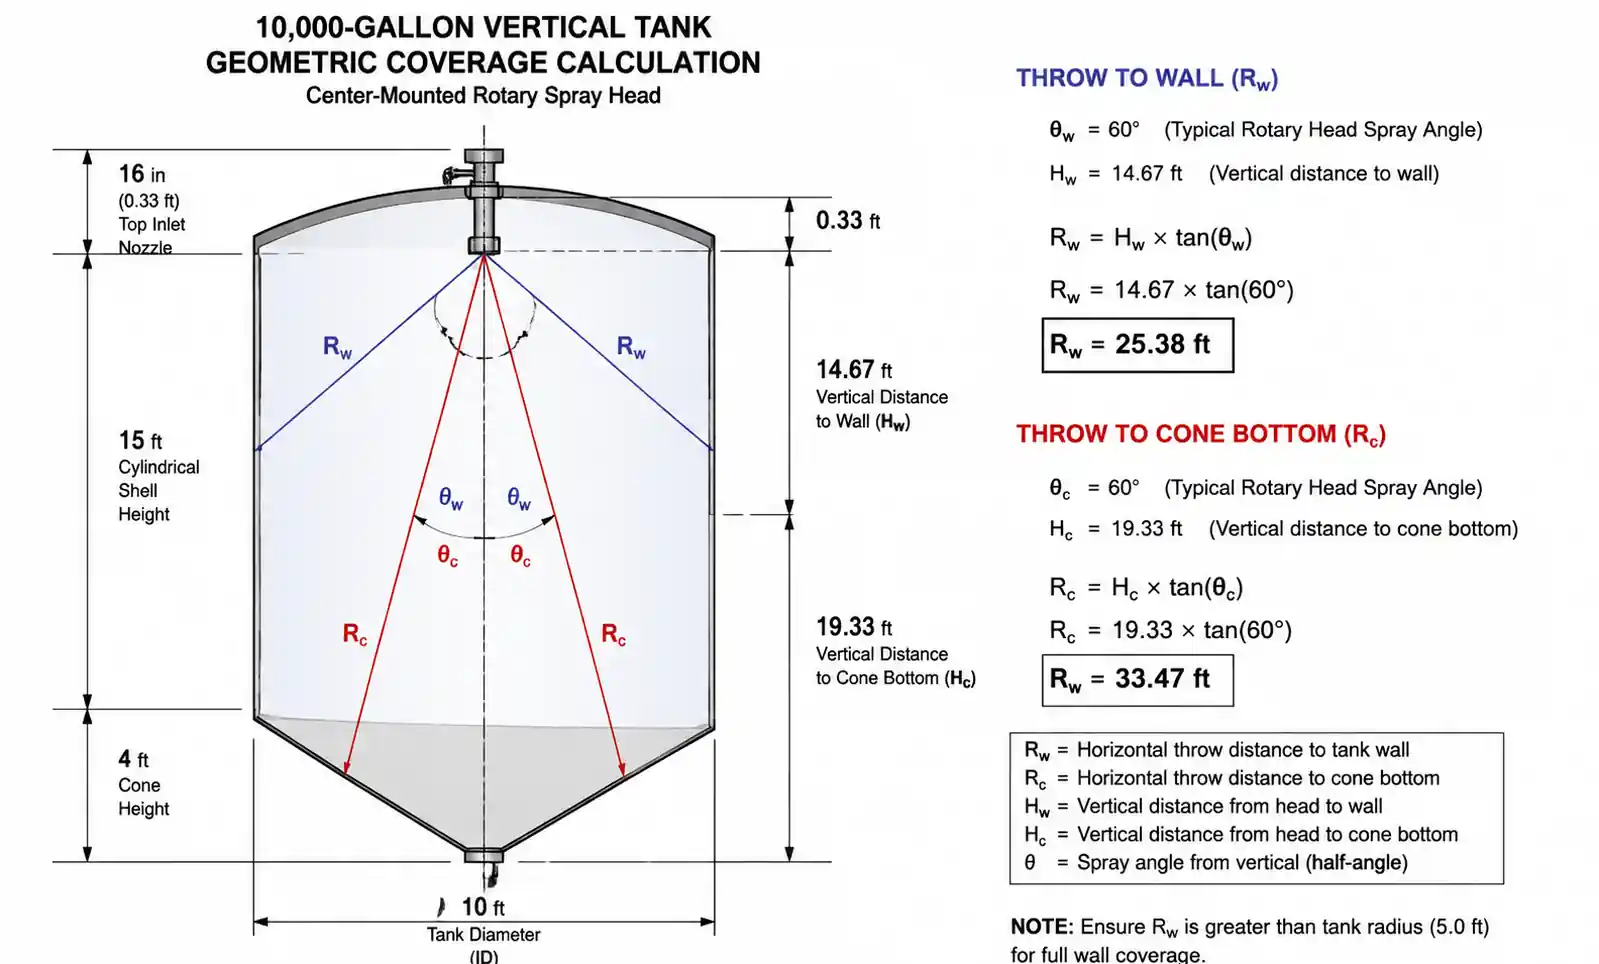
Step 2: Calculate throw distance — Max horizontal = 5 ft (radius). Vertical = 20 ft. Diagonal throw = √(5² + 20²) = 20.6 ft. Need nozzle rated for ≥21 ft at 40 PSI.
Step 3: Select candidate — Manufacturer data shows Model XYZ-40 provides 24-ft throw, 35 GPM at 40 PSI, 360° rotation in 6 minutes, 8 PSI impact at 10 ft.
Step 4: Verify shadow coverage — With 1.67 rotations in 10 minutes, shadowed areas receive multiple-angle coverage. Extend to 12 minutes for 2 complete rotations.
Step 5: Confirm pressure/flow — Verify pump delivers 35 GPM at 40 PSI to nozzle inlet (account for 3–5 PSI line loss).
Result: XYZ-40 rotary jet head, top-center mounted, 40 PSI, 12-minute cycle.
5. Installation Best Practices
Mounting Position: Top-center mounting is standard for vertical tanks—provides 360° horizontal coverage and maximum vertical throw. For horizontal tanks, mount at one end along the centerline. If length exceeds 2× throw distance, use two nozzles (one at each end) with staggered rotation timing.
Clearance Requirements:
- Top-mounted nozzle to liquid surface: 18" minimum above max fill level
- Nozzle to internal structures: 12" clearance to agitator shafts, 8" to thermowells
- Nozzle to tank wall: 6" clearance for rotary mechanism
Supply Line Best Practices:
- Use manufacturer's recommended connection size—undersizing chokes flow
- Install strainer upstream (80-mesh for rotary, 200-mesh for static balls)
6. Field Validation Methods
Riboflavin Tracer Test (Gold Standard for Pharma/Food): Add riboflavin (vitamin B2) to cleaning solution at 20–50 ppm. After cycle, inspect under UV black light (365 nm). Dead zones appear dark—riboflavin fluoresces yellow-green where coverage occurred. Protocol: pre-clean, run cycle with 50 ppm riboflavin, drain, inspect in darkened space, document dark spots >2 in².
Water-Sensitive Paper Method (Industrial/Chemical): Attach paper strips to suspect areas. Run water-only cycle. Paper turns blue where wetted—yellow indicates dead zone. Less rigorous than riboflavin but useful for rapid troubleshooting.
Conductivity Mapping (Large Tanks >5,000 gal): Mount conductivity probes at multiple positions. Inject tracer during cleaning—delayed or reduced readings indicate poor coverage.
7. Troubleshooting Persistent Dead Zones
| Dead Zone Location | Most Likely Cause | Primary Fix | Secondary Fix |
|---|---|---|---|
| Tank bottom / cone | Insufficient vertical throw | Add bottom-wash nozzle | Extend cycle time +50% |
| Behind internal structures | Spray shadowing | Increase rotation cycles | Add targeted spray bars |
| Near nozzle mount | Inadequate near-field spray angle | Select nozzle with downward jets | Add static spray ring |
| Single quadrant | Rotary mechanism failure or pressure drop | Service/replace nozzle | Verify stable pressure supply |
| Entire tank inconsistent | Undersized nozzle or low pressure | Upgrade to higher-capacity nozzle | Increase supply pressure |
8. FAQ
Can I use a smaller nozzle and just increase cycle time?
Only if the issue is incomplete rotation cycles. If the nozzle lacks throw distance to reach walls, no amount of time will help—match throw to geometry first.
How often should I replace tank cleaning nozzles?
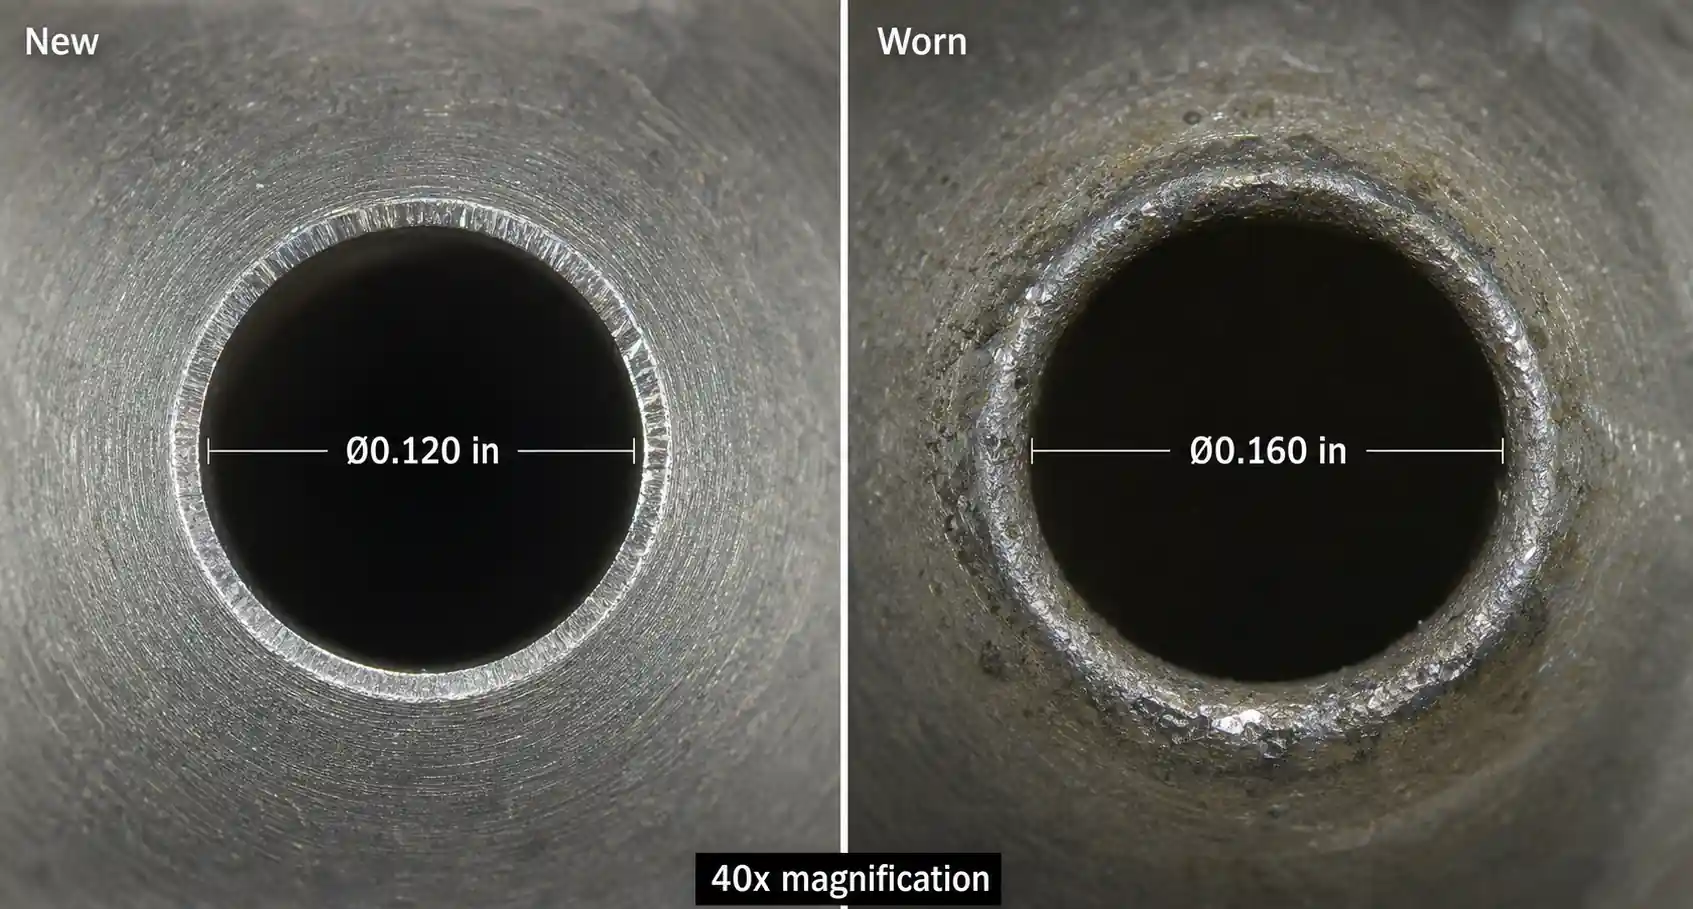
Rotary heads: inspect bearings/seals every 6–12 months; replace when rotation inconsistent or flow drops >10%. Static balls: check for clogged orifices quarterly. Abrasive/scaling applications: plan annual replacement.
What pressure should I run at?
Use manufacturer's rated operating pressure (typically 30–50 PSI for rotary, 20–40 PSI for static). Lower pressure reduces throw; higher pressure over-atomizes. Test at mid-range and validate.
Can I clean rectangular tanks with rotary jet heads?
Rotary heads are optimized for cylindrical geometries. Rectangular tanks typically need multiple nozzles or static spray bars with overlapping flat-fan nozzles.
Do I need heated cleaning solution?
Temperature improves chemistry but doesn't eliminate dead zones. Fix coverage first, then optimize temperature.
9. Conclusion
Eliminating dead zones requires matching nozzle throw to tank geometry, ensuring adequate pressure and flow, accounting for internal obstructions, and validating coverage through rigorous testing. The most common mistake is selecting based on volume alone—a 5,000-gallon short tank has completely different requirements than a 5,000-gallon tall tank.
Persistent dead zones despite "properly sized" equipment usually point to details: worn bearings, pressure drops, or unaccounted internal structures. We've eliminated dead zones that existed for years simply by switching from a static spray ball to a properly sized rotary head and extending cycle time by 4 minutes.